By Mendy Levi
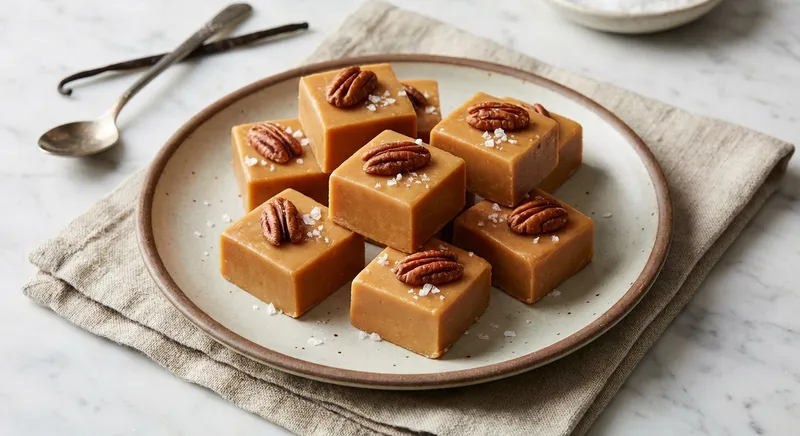
Silky, caramel-kissed fudge made from just sugar, butter and whole milk — a classic penuche-style confection. The result is a glossy, melt-in-your-mouth square with deep butterscotch notes from the cooked sugar and rich creaminess from butter and milk. Simple ingredients, refined technique: the gentle boiling and controlled cooling produce a luxuriously smooth texture that tastes far more sophisticated than its ingredient list suggests.
Line an 8-inch square baking pan with parchment, leaving an overhang on two sides to lift the fudge out later. Lightly butter the parchment. Having the pan ready ensures immediate transfer of cooked fudge to a shallow container (rapidly cooling a thin layer helps set a smooth texture).
Weigh or measure the ingredients precisely. Place the sugar in a heavy-bottomed medium saucepan (preferably 2 to 3 quarts). A heavy pan distributes heat evenly and reduces risk of hot spots that scorch sugar — a scorched batch equals bitter flavor.
Add the milk to the sugar in the pan and gently stir to wet all sugar granules. This creates a uniform syrup as it heats. Turn the heat to medium — the goal is to dissolve sugar first, then bring to a boil. Avoid starting on high heat, which can cause uneven caramelization and crystallization.
Once the sugar is fully dissolved and the mixture is simmering, reduce to medium-low and clip in a reliable candy thermometer (or ensure your thermometer will reach 240°F / 116°C). Cook the syrup, stirring occasionally, until it reaches the soft-ball stage (234–240°F / 112–116°C). Reaching this temperature gives the correct concentration of sugar for creamy fudge that will set but remain tender.
While the syrup cooks, brush down any sugar crystals that climb the sides of the pan with a wet pastry brush (dip in the 2 tablespoons cold water). Removing stray crystals helps prevent premature crystallization which causes grainy, sandy fudge.
When the syrup hits 234–240°F (soft-ball stage), remove the pan from the heat. Immediately add the butter and salt. Stir gently until the butter melts — adding fat now enriches the syrup and will help the final texture be smooth and pliable.
Scrape the mixture into a large heatproof mixing bowl. Allow the mixture to cool undisturbed to about 110–115°F (just warm to the touch) — roughly 15–20 minutes. Cooling without stirring is essential: it lets the syrup drop below the critical temperature where controlled crystallization can begin when you beat it.
Once the mixture has cooled to 110–115°F, add the vanilla. Using a wooden spoon or a stand mixer fitted with the paddle, beat the mixture briskly. You are not aerating for volume so much as encouraging many fine sugar crystals to form; beating turns the glossy syrup into a thick, opaque, velvety mass. This will take 5–10 minutes by hand, less with a mixer. Stop when the mixture loses gloss and holds its shape briefly on the spoon.
Quickly scrape the beaten fudge into the prepared pan and smooth the top with an offset spatula. Quick transfer prevents the mixture from setting in the bowl and ensures a smooth finish. If desired, score the surface lightly to guide even squares once set.
Cool the pan at room temperature for 30–45 minutes until no longer hot, then transfer to the refrigerator and chill for at least 2 hours to firm completely. Cooling first at room temperature prevents moisture condensation on the surface, which can affect texture and appearance.
Lift the fudge out using the parchment overhang. Trim the edges for neat squares and cut into 16 even pieces with a sharp knife (wipe the blade between cuts for clean slices). Return to the fridge if too soft while cutting.
Store fudge in an airtight container at cool room temperature for up to a week or in the refrigerator for up to 2 weeks. Bring to room temperature before serving for the best melt-in-mouth texture.
236
Calories
1g
Protein
32g
Carbs
12g
Fat
0g
Fiber
How did this recipe turn out? Let others know!
to rate this recipe
By Mendy Levi
Silky, caramel-kissed fudge made from just sugar, butter and whole milk — a classic penuche-style confection. The result is a glossy, melt-in-your-mouth square with deep butterscotch notes from the cooked sugar and rich creaminess from butter and milk. Simple ingredients, refined technique: the gentle boiling and controlled cooling produce a luxuriously smooth texture that tastes far more sophisticated than its ingredient list suggests.
Line an 8-inch square baking pan with parchment, leaving an overhang on two sides to lift the fudge out later. Lightly butter the parchment. Having the pan ready ensures immediate transfer of cooked fudge to a shallow container (rapidly cooling a thin layer helps set a smooth texture).
Weigh or measure the ingredients precisely. Place the sugar in a heavy-bottomed medium saucepan (preferably 2 to 3 quarts). A heavy pan distributes heat evenly and reduces risk of hot spots that scorch sugar — a scorched batch equals bitter flavor.
Add the milk to the sugar in the pan and gently stir to wet all sugar granules. This creates a uniform syrup as it heats. Turn the heat to medium — the goal is to dissolve sugar first, then bring to a boil. Avoid starting on high heat, which can cause uneven caramelization and crystallization.
Once the sugar is fully dissolved and the mixture is simmering, reduce to medium-low and clip in a reliable candy thermometer (or ensure your thermometer will reach 240°F / 116°C). Cook the syrup, stirring occasionally, until it reaches the soft-ball stage (234–240°F / 112–116°C). Reaching this temperature gives the correct concentration of sugar for creamy fudge that will set but remain tender.
While the syrup cooks, brush down any sugar crystals that climb the sides of the pan with a wet pastry brush (dip in the 2 tablespoons cold water). Removing stray crystals helps prevent premature crystallization which causes grainy, sandy fudge.
When the syrup hits 234–240°F (soft-ball stage), remove the pan from the heat. Immediately add the butter and salt. Stir gently until the butter melts — adding fat now enriches the syrup and will help the final texture be smooth and pliable.
Scrape the mixture into a large heatproof mixing bowl. Allow the mixture to cool undisturbed to about 110–115°F (just warm to the touch) — roughly 15–20 minutes. Cooling without stirring is essential: it lets the syrup drop below the critical temperature where controlled crystallization can begin when you beat it.
Once the mixture has cooled to 110–115°F, add the vanilla. Using a wooden spoon or a stand mixer fitted with the paddle, beat the mixture briskly. You are not aerating for volume so much as encouraging many fine sugar crystals to form; beating turns the glossy syrup into a thick, opaque, velvety mass. This will take 5–10 minutes by hand, less with a mixer. Stop when the mixture loses gloss and holds its shape briefly on the spoon.
Quickly scrape the beaten fudge into the prepared pan and smooth the top with an offset spatula. Quick transfer prevents the mixture from setting in the bowl and ensures a smooth finish. If desired, score the surface lightly to guide even squares once set.
Cool the pan at room temperature for 30–45 minutes until no longer hot, then transfer to the refrigerator and chill for at least 2 hours to firm completely. Cooling first at room temperature prevents moisture condensation on the surface, which can affect texture and appearance.
Lift the fudge out using the parchment overhang. Trim the edges for neat squares and cut into 16 even pieces with a sharp knife (wipe the blade between cuts for clean slices). Return to the fridge if too soft while cutting.
Store fudge in an airtight container at cool room temperature for up to a week or in the refrigerator for up to 2 weeks. Bring to room temperature before serving for the best melt-in-mouth texture.
236
Calories
1g
Protein
32g
Carbs
12g
Fat
0g
Fiber
Your Rating:
