Introduction
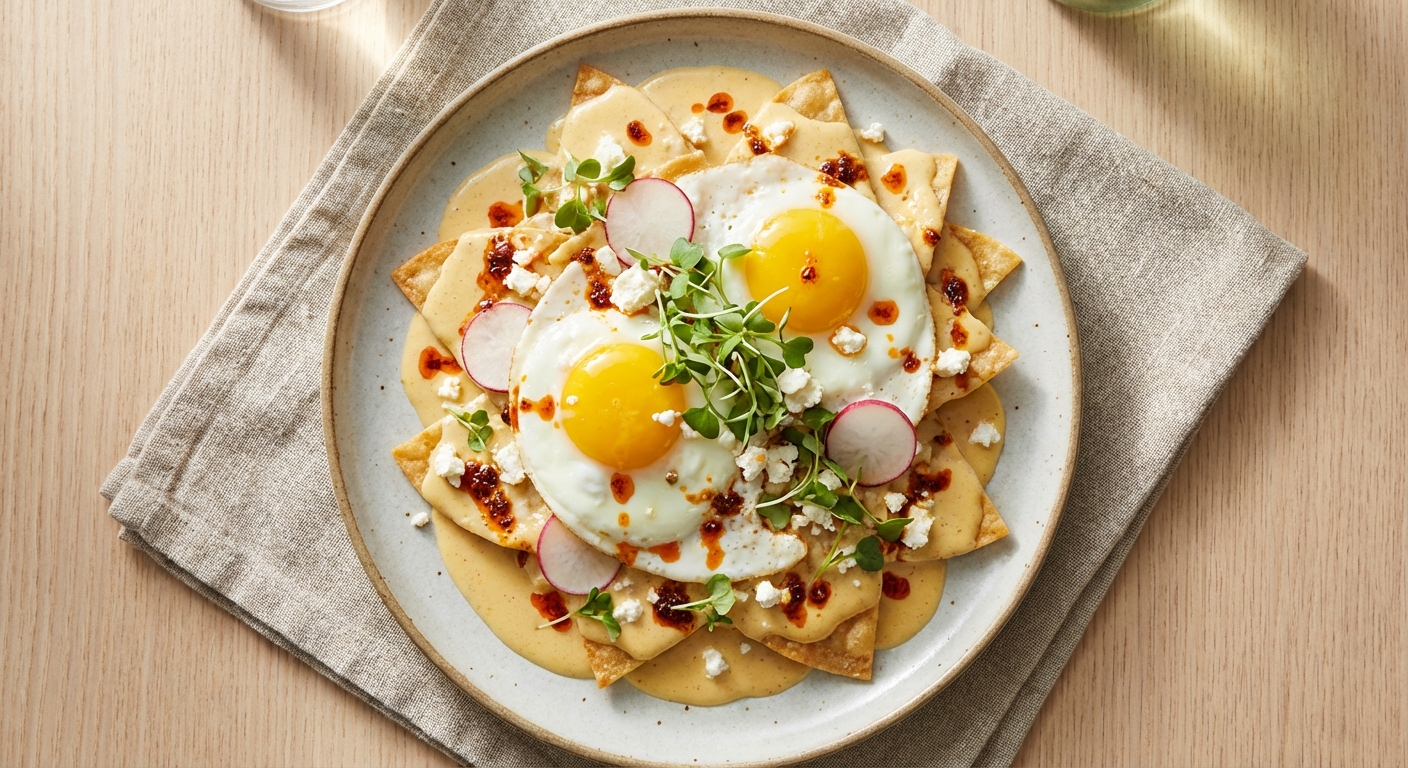
When I’m craving something that feels festive but still comforting enough for a Tuesday night, I reach for chilaquiles. The idea of folding tortilla chips into a saucy, sunset-toned skillet is irresistible: crispy edges, glossy sauce, and a pool of runny yolks waiting to break open and mingle with the creaminess. This particular twist—Pan-Fried Flour Chip Chilaquiles with Creamy Spiced Milk Sauce and Runny Eggs—is all about textures and balance. We’re starting with quick flour tortillas that bake into crisp, chip-like discs, then tossing them in a velvety spiced milk sauce that’s deeply flavorful yet not tomato-drenched. The finish is two sunny-side-up eggs perched atop the saucy chips, yolks that surrender to the sauce and turn each bite into a silken, luxurious bite. It’s like brunch and dinner had a delicious, slightly indulgent baby together, and I’m here for it every single time.
One of the things I love about this recipe is the method: bake the chips instead of frying for a lighter, crisper bite that still holds up to the sauce. The onion gets caramelized to a deep, honeyed sweetness, which is the backbone of the sauce’s depth. Then we build a quick roux, bloom warm spices, and whisk in milk for a creamy, comforting finish. And yes, the eggs—fry them gently so they stay tender with runny yolks that pour into the sauce like a golden river—are the final flourish that makes this dish feel both rustic and restaurant-worthy. If you’re a fan of chilaquiles but want a version you can make with pantry staples in less than an hour, this recipe is a dream.
This dish lives in our Delicious homemade category, where weeknight favorites get a playful twist. It’s a perfect bridge recipe for guests who think chilaquiles must be a Saturday brunch affair—reminding them that comfort can also be spectacularly punchy and satisfying on a weeknight. Grab a seat at the counter, pour a small squeeze of lime, and let the aroma of caramelized onions and warm spices carry you into a comforting, delicious moment.
Ingredients Benefits
Here’s a peek at what makes this recipe work so well, with quick notes on why each component matters. I’ve linked to key ingredients so you can learn more about their flavor profiles and best practices.
- All-purpose flour — the backbone of quick tortillas. It’s forgiving, sturdy, and forms a dough that rolls thin for crisping into chips that stay sturdy under sauce.
- Warm water — hydrates the flour just enough to bring the dough together without making it sticky. The touch of warmth helps the dough relax when it rests.
- Salt — a small amount boosts flavor in the dough and balances the creamy sauce later on.
- Neutral oil — brushed on the discs before baking to promote browning and crisping without imparting heavy, fatty flavors.
- Unsalted butter — used in the caramelized onion and to build the roux; it carries the aromatics and helps the sauce emulsify into a silky finish.
- Whole milk — the creamy foundation of the sauce; it brings richness without chalkiness, and helps the spices bloom.
- Onion — caramelized to build a sweet, savory depth that echoes traditional salsa bases while staying distinctly milky and dairy-forward here.
- Garlic — quick, bright, and aromatic; it rounds out the onion’s sweetness with a little punch.
- Smoked paprika — lends a smoky, casi-lieback to the sauce that makes it feel like a roasted, not tomato-based, salsa.
- Chili powder — a gentle kick that deepens the milky sauce and adds warmth without overwhelming heat.
- Cumin — earthy, nutty warmth that hints at Mexican-forward spice profiles and keeps the sauce from tasting flat.
- Cayenne pepper — optional, for a bright, quick heat that wakes up the dish in the final minutes.
- Eggs — fried to order with a runny yolk that becomes part of the sauce’s silkiness when broken open on top of the chips.
As you read through the steps, you’ll notice the rhythm: dough, roll, bake, caramelize, roux, milk, assemble, fry eggs, finish. It’s a rhythm I’ve found to be almost meditative, and it ensures every bite has a bit of crunch, a bit of creamy heat, and a cheeky, comforting finish. If you’re curious where this recipe stands in the broader world of home cooking, you can explore more in our Delicious homemade collection.
Expert Tips
- Roll thin, bake crisp. Rolling the dough into very thin discs is the difference between chips and doughy circles. Thin discs crisp up beautifully in a hot oven, and the 10–12 minute bake time is enough to turn edges amber and chips sturdy enough to hold sauce without turning to dust. If you’re pressed for time, you can cut the discs into 1-inch wedges before baking so they crisp up in more uniform shapes.
- Caramelize the onion fully. Don’t rush this step. A deeply golden onion adds a layer of sweetness and savoriness that brims with flavor in the sauce. If you’re pressed for time, you can sauté it a touch longer at a gentler heat and finish with a splash of water to loosen any fond from the pan.
- Bloom the spices for depth. Toasting smoked paprika, chili powder, cumin, and cayenne briefly in the hot roux draws out their flavors and prevents flat, raw-spice notes. Keep the heat medium-low and stir constantly for 20–30 seconds after the spices hit the fat.
- Sauce consistency matters. The sauce should thin slightly when it coats the back of a spoon. If it thickens too much, whisk in a tablespoon or two of water or milk to loosen. The goal is saucy, not pudding-thick, so you get that glossy coating without clumping.
- Eggs: gentle and generous. Cook the eggs over medium-low heat so the whites set slowly and the yolks stay luxuriously runny. If you prefer firmer yolks, give them a minute or two longer, but runny yolks are what makes the dish feel indulgent and cohesive with the sauce.
Serving Suggestions
As you plate, you’ll want a balance of textures and a few bright accents to cut through the dairy-rich sauce. Here are a few ideas that stay respectful to the dish’s flavor profile while elevating the experience:
- Finish with a drizzle of the remaining sauce from the skillet, then top with a pinch of freshly ground black pepper and a light dusting of smoked paprika for color.
- Garnish with chopped cilantro or a squeeze of lime to introduce a fresh, citrusy note that brightens the richness of the milk sauce.
- Offer a dollop of crema or sour cream alongside so guests can stir in a little tang as they break the yolk.
- Serve with a simple side of roasted peppers, avocado slices, or a quick pico de gallo to echo the dish’s Mexican-inspired essence without overpowering the creamy sauce.
Pro-tip: if you’re feeding a crowd, you can keep the chips warm and crisp on a baking sheet in a low oven (about 200°F/93°C) while you fry the eggs in batches. Then, you’ll have a seamless, elegant service where everyone gets that perfect bite with a runny yolk.
FAQ
- How long do leftovers keep? Leftovers can be stored in an airtight container in the refrigerator for up to 2 days. Reheat the chips and sauce separately in a skillet over low heat, then reassemble with fresh eggs. The key is to gently rewarm so the chips don’t turn soft or soggy.
- Can I make parts ahead? Yes. The dough can be mixed and rested ahead of time, and the chips can be baked a day in advance and stored in an airtight container. The caramelized onions and the spiced milk sauce can be made a day ahead and reheated gently. Then fry the eggs to order right before serving for the best texture and yolk runniness.
- substitutions or dairy-free option? If you’d like to keep dairy to a minimum or swap in a non-dairy milk, you can try unsweetened almond or oat milk, but note that the sauce will lack the same level of richness. For the best result, keep the base milk as whole dairy milk. If needed, you can dilute the butter slightly with a neutral oil to maintain the roux’s emulsification.
- What if I don’t have a 425°F oven? If your oven runs cool, you can bake the chips at 400°F (204°C) for 12–14 minutes, watching carefully to achieve a deep golden hue. The key is to avoid soggy, under-crisp chips—thin discs baked until crisp will retain their bite when sauced.
And there you have it: a comforting, spicy, creamy pan of chilaquiles where every bite brings a little something to the plate—crisp edges, lush sauce, and a yolk that breaks into the mix like molten gold. If you give this recipe a try, I’d love to hear how your runny-eggs-on-top moment plays out in your kitchen. Tag me in your photos and let the yolk spill into the sauce like a little magic.
Feeling inspired to create more in your kitchen? Start by exploring other recipes in our collection and dreaming up your own twists. Happy cooking!
Want to keep exploring? Check out more recipes and ideas in our /category/delicious-homemade collection, or start your own culinary journey by visiting /create.