Introduction
There’s something irresistibly comforting about a Classic Butter Cake—the way the kitchen fills with warm vanilla, the soft sound of sugar meeting butter, and the sense that you’re about to bake a small moment of happiness into a loaf pan. My own love affair with this simple cake began in a sunlit afternoon of summer baking with my grandmother. We would pull out the worn recipe card, the one smeared with a lifetime of measurements, and the air would instantly bloom with the scent of melted butter and sweet cream. It felt like a ritual: measure, mix, pour, and wait as the batter rose into a tender, sun-gold cake that tasted like home. This recipe, coded in a few straightforward steps and a classic balance of flavors, is a bridge to those memories—and a reliable favorite for a crowd-pleasing dessert that never disappoints.
As you read through the steps, you’ll notice that this is a cake built on dependable, everyday ingredients. The batter comes together with a few simple actions, and the result is a moist, airy crumb with just the right vanilla note. If you’re curious about the building blocks, the core ingredients that make this cake sing include all-purpose flour, sugar, butter, eggs, vegetable oil, baking powder, a pinch of salt, a splash of vanilla extract, and milk. This cake lives comfortably in the realms of Dessert and Baking, two partners in crime for cozy evenings and celebratory occasions alike.
Whether you’re baking for a birthday, a Sunday tea, or a quick weeknight treat, the Classic Butter Cake is a reliable canvas. It’s not fussy, but it’s deeply satisfying—an honest, unpretentious cake that shines with a simple glaze, a dusting of powdered sugar, or a surge of fresh berries. I’ve learned to treat this recipe as a warm invitation: you can follow it exactly for a dependable result, or you can adapt it with a personal twist—a citrus zest in the batter, a coffee-chocolate ripple, or a tangy lemon glaze on top. Today, we’ll dive into how each component contributes to the final texture and flavor, how to master the technique, and how to present and serve this beloved cake with confidence. And if you’re new to the kitchen, fear not—the steps are straightforward, and the aroma alone is a reward that makes any kitchen feel like a bakery.
Ingredients Benefits
In any cake, ingredients aren’t just fillers; they’re the orchestra that conducts taste, texture, and aroma. Here’s how each component of this Classic Butter Cake plays its part, along with quick notes on how to maximize their benefits. For quick reference, I’ve linked each key ingredient to its dedicated page so you can explore more about its role and substitutes if you wish.
- All-purpose flour — The backbone of the structure. The flour provides balance between tenderness and stability; too much and the cake suffers from toughness, too little and it collapses. For best results in this recipe, measure carefully, sift with the baking powder to ensure even leavening, and avoid overmixing once the dry ingredients have been added.
- Sugar — Sugar not only sweetens but also helps with browning and moisture retention. Creaming sugar with butter (see the next ingredient) creates air pockets that contribute to a light crumb. If you’re aiming for a softer texture, you can experiment with a portion of brown sugar for a subtle molasses note.
- Butter — The flavor heart of this cake. Butter gives a rich, toasty taste and helps tenderize the crumb through its fat content. Be sure to use unsalted butter so you can control the salt level precisely. Creaming butter with sugar introduces air to the batter, setting the stage for a tender cake.
- Eggs — Eggs provide structure through their proteins and also enrich the batter. Using room-temperature eggs makes emulsification smoother, yielding a finer crumb. If you’re using cold eggs, a quick warm-water bath for the eggs (before beating) can help them blend more evenly with the batter.
- Vegetable oil — This cake gets moisture from oil, which helps keep the crumb soft and prevents it from drying out. Adding oil after the initial creaming step helps create a smooth, cohesive batter. If you prefer a lighter mouthfeel, you can substitute part of the oil with melted butter, but note that this may slightly alter the flavor and texture.
- Baking powder — The leavening agent that lifts the batter, creating a cake with a light, open crumb. Sifting it with the flour ensures even distribution, which translates into uniform rise and fewer dense pockets in the final slice.
- Salt — A tiny but mighty flavor enhancer. Salt sharpens sweetness and helps balance the vanilla. If you’re using unsalted butter, this pinch becomes even more important.
- Vanilla extract — Adds that signature warm aroma that makes a butter cake feel timeless. A high-quality vanilla can elevate the entire batter—look for a robust, fragrant extract or consider a splash of vanilla bean paste for a speckled, richer flavor.
- Milk — Provides moisture and tenderness. Alternating the dry ingredients with milk, beginning and ending with flour, creates a well-emulsified batter that bakes into a stable structure without becoming dense. If you’d like to add a tiny depth, a splash of buttermilk can be used in place of regular milk for a subtle tang.
As you can see, these ingredients aren’t just a random assortment; they’re chosen for balance. The batter travels through stages—creaming, beating in eggs, and gentle folding of dry into wet—that work together to yield a cake that’s moist yet sturdy enough to slice neatly. The overall effect is a classic butter cake that tastes like a timeless recipe passed down through generations, yet forgiving enough for a modern kitchen.
Expert Tips
Even the best ingredients can fall flat without a few practical tips. Here are my tried-and-true recommendations to ensure your Classic Butter Cake turns out beautifully every time, whether you’re baking solo on a quiet weekend or baking for a crowd.
- Prep smart: Preheat the oven to 350°F (175°C) and prepare your pan with grease and a light flour dusting. A well-greased pan prevents sticking and makes turning the cake out a breeze. If you want extra assurance, line the loaf pan with parchment paper for clean release.
- Measure and mix with care: Cream the butter and sugar until light and fluffy; this aerates the batter and helps trap air for a tender crumb. Add eggs one at a time, beating well after each addition to maintain emulsion. Stir in vanilla extract until just combined to preserve its aroma.
- Dry-to-wet strategy: Sift the flour with baking powder and salt, then add to the wet mixture in batches, alternating with milk, beginning and ending with the flour. Mix just until combined; overmixing can develop gluten and make the cake tougher.
- Oil for moisture: Stir in the vegetable oil until the batter is smooth. Oil helps retain moisture and keeps the crumb tender. If you want to experiment, you can substitute part of the oil with melted butter for a richer flavor, understanding that it may impact the crumb a touch.
- Pan handling and bake time: Pour the batter into the prepared pan and bake for 40-45 minutes, until a toothpick inserted into the center comes out clean. If your oven runs hot or cool, consider using an oven thermometer to verify the temperature. Every oven is different, and this small check can prevent overbaking.
- Cool with care: Let the cake cool in the pan for about 10 minutes before turning it onto a rack to cool completely. Patience here ensures the crumb finishes setting and slices beautifully.
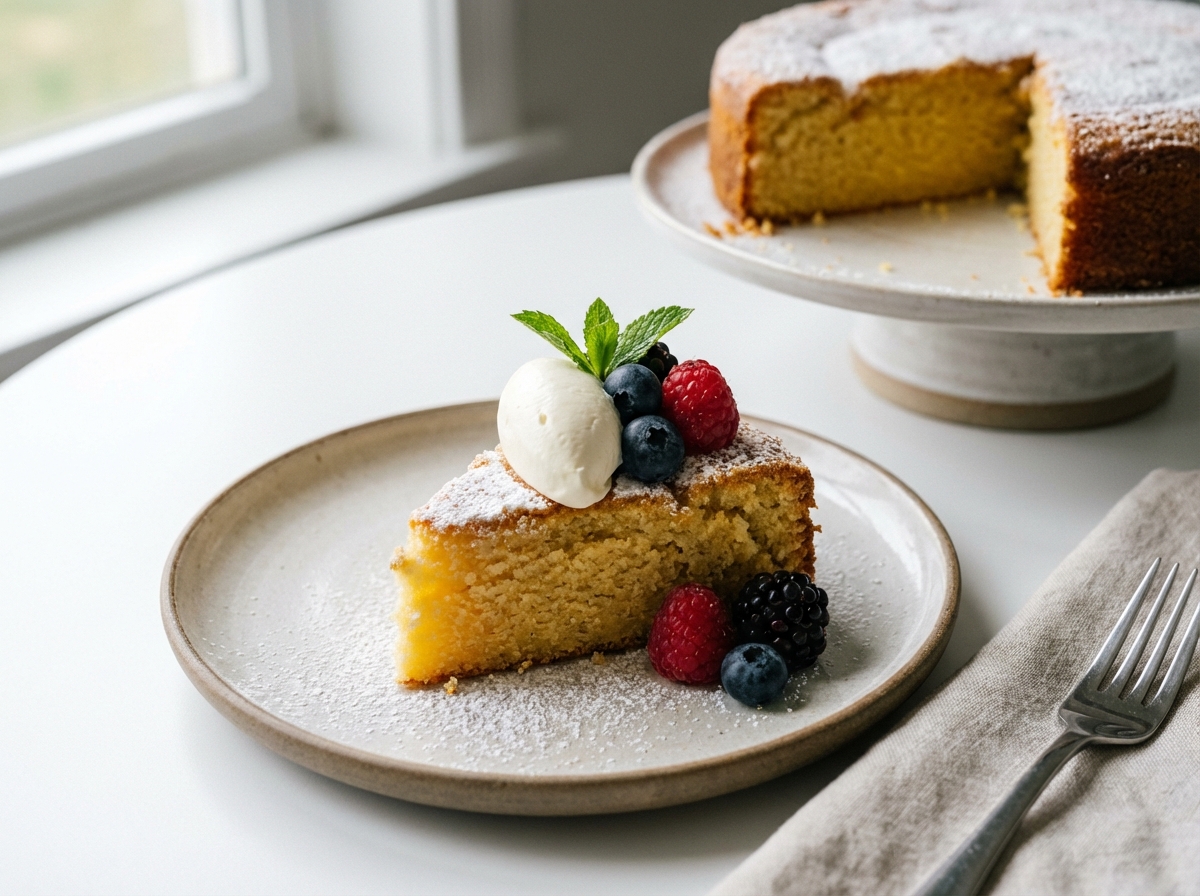
- Flavor and presentation: A light glaze or simply a dusting of powdered sugar can elevate the cake for guests. If you’re serving it with berries, a dollop of lightly sweetened whipped cream or a kiss of lemon zest can brighten the flavors without overpowering the vanilla notes.
Serving Suggestions
The beauty of a Classic Butter Cake lies in its versatility. Here are a few serving ideas and presentation tips that keep this dessert feeling new, even as it remains wonderfully familiar.
- Glazed elegance: A thin lemon glaze or vanilla glaze brushed on while the cake is still warm creates a glossy finish that bedazzles without masking the crumb. A glaze made with confectioners’ sugar and a little lemon juice adds brightness and a hint of tang that pairs beautifully with vanilla.
- Berry accompaniment: Fresh berries—raspberries, strawberries, blueberries—or a berry compote offer a lively counterpoint to the cake’s buttery richness. A spoonful of whipped cream or a dollop of light yogurt can provide a creamy contrast that brightens each bite.
- Holiday-ready or everyday: For a simple celebration, serve the cake with a dusting of powdered sugar and a few edible petals. For a more indulgent treat, pair it with a warm chocolate sauce or a caramel drizzle that seeps into the crumb like a secret. The result is a comforting, crowd-pleasing dessert that feels both classic and celebratory.
- Make-ahead magic: This cake freezes well. Once cooled, wrap tightly in plastic wrap and refrigerate for up to 3 days or freeze for up to 2-3 months. Thaw at room temperature and give it a light re-glaze or a fresh dusting of sugar to revive its appearance and flavor.
- Pairing with beverages: A hot cup of tea or coffee is the perfect partner for a slice of butter cake. The vanilla notes complement the roasted aromas of coffee, while a light, citrusy tea can add a refreshing balance to the sweetness.
As you plate slices for friends or family, remember that this is a recipe you can tweak to suit your mood or the occasion. The recipe’s core stays steadfast, but the toppings, glazes, and accompaniments can morph to reflect your personal touch. If you’re ready to try your own hand at crafting delicious memories in the kitchen, you can find inspiration and more ingredient ideas along with your next creation by visiting our Baking and Dessert pages.
And if you’re feeling inspired to design something entirely new, why not start your own project right now? Create your own recipes and share your kitchen experiments with the world—or simply use the platform to refine your technique and build confidence in the kitchen.
FAQ
- How long does Classic Butter Cake keep?
- The cake stays moist and tasty for 2-3 days at room temperature when stored in an airtight container. For longer freshness, refrigerate for up to 5 days, though refrigerating may cause the crumb to be a touch firmer. If you freeze the cake, wrap tightly and store for 2-3 months; thaw at room temperature and re-glaze or dust with sugar before serving for the best texture and brightness.
- Can I make this ahead?
- Yes. You can prepare the batter up to the point of pouring into the pan and refrigerate it covered for up to 24 hours before baking. The cooler batter may take a few minutes longer to bake, so keep an eye on it and test with a toothpick to ensure it comes out clean. If you want to bake in advance for an event, bake the cake through, cool completely, wrap tightly, and refrigerate. A gentle rewarm in a low oven or microwave-safe reheating can revive some of the initial softness.
- What substitutions work well?
- You can experiment with substitutions, but keep the ratios in mind. Try replacing part of the flour with a portion of almond flour for a nutty aroma and a slightly denser crumb, or swap in yogurt or buttermilk in place of some of the milk for extra tenderness and tang. If you’re dairy-free, you can substitute neutral oil for butter and use a dairy-free butter substitute; however, this will alter flavor and texture. Always maintain the same total fat and liquid content to keep the batter balanced.
- Is this cake suitable for dietary restrictions?
- This classic recipe uses dairy, eggs, and gluten-containing flour. To adapt for allergies or intolerances, you’d need to experiment with gluten-free flour blends and dairy-free substitutes, understanding that changes in texture and flavor are possible. If you’re baking for someone with allergies, it’s best to test in small quantities first and clearly label substitutions.
If you loved this butter cake and want to explore more recipes like it, remember that the kitchen is your studio. You can find additional inspiration and guidelines by exploring our Dessert and Baking sections. And when you’re ready to map out your culinary journey, take the next step and start creating your own recipes at this page.