Growing up in a big family, the aroma of freshly baked bread often filled our home, calling everyone to gather around the kitchen. My grandmother always be...
Ready to cook?
View the Full Recipe
Get the complete ingredient list, step-by-step instructions, and nutritional info
View Recipe →Growing up in a big family, the aroma of freshly baked bread often filled our home, calling everyone to gather around the kitchen. My grandmother always believed that homemade bread had the power to bring people closer, thanks to the kneading process that requires patience and love in equal measure. Over time, I’ve come to treasure this act of bread baking. It’s a soothing ritual that can turn an ordinary afternoon into something truly memorable. There’s something magical about transforming flour, yeast, and a few simple ingredients into a golden, fluffy loaf that essentially says, “Welcome home.” In today’s busy world, taking the time to bake your own bread might sound old-fashioned, but trust me, the payoff is well worth the effort.
If you’re new to bread baking, don’t worry; this recipe is straightforward, uses accessible ingredients, and yields consistently impressive results. Not only will your kitchen smell phenomenal, but you’ll also have a wholesome loaf to share (or keep to yourself—no judgment here!). Whether you’re looking for a reliable recipe to start a new baking tradition or simply want to explore the delights of fresh, warm bread, I hope this post guides you every step of the way. Before diving into the instructions, let’s talk about what makes homemade bread so rewarding and how the key ingredients work together to create perfect loaves each time.
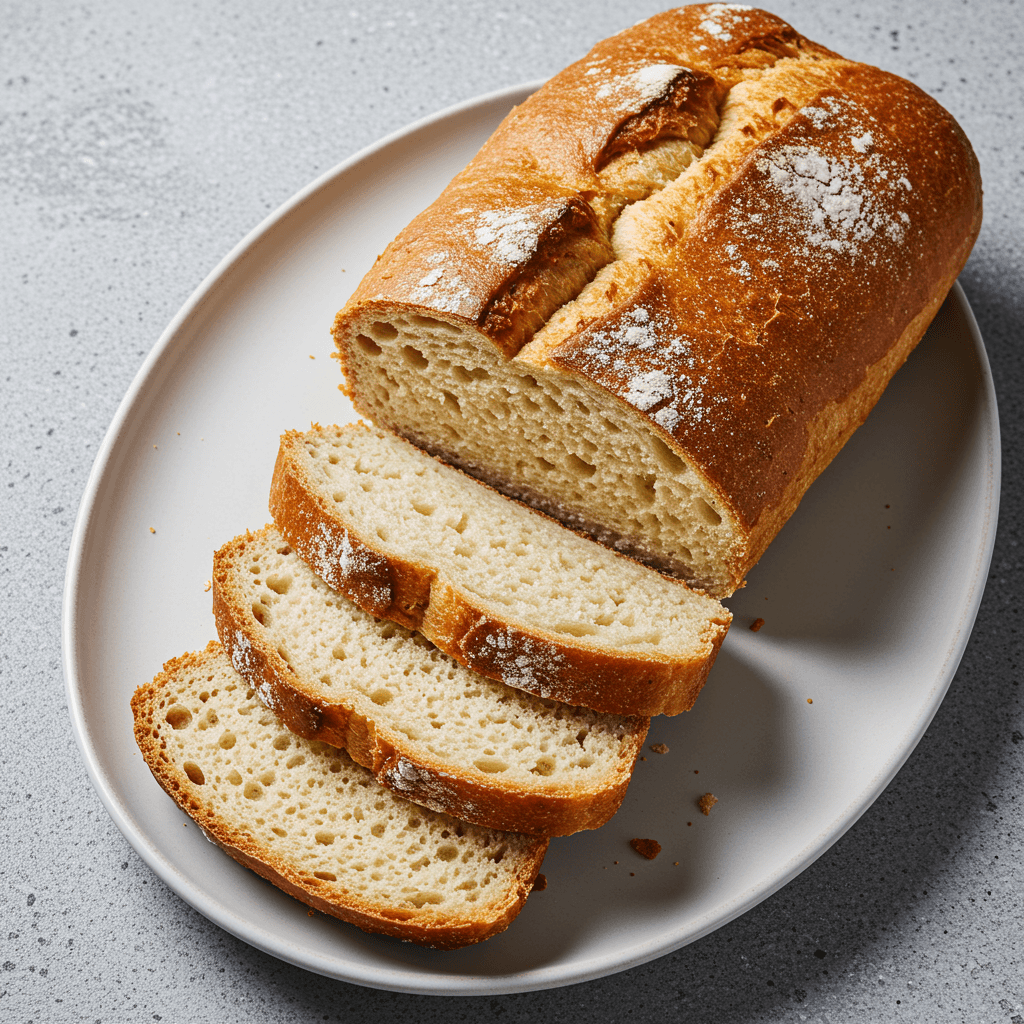
The Joy of Freshly Baked Bread
There’s an undeniable comfort in biting into a slice of newly baked bread. The warm crust crackles, and the soft interior practically melts in your mouth. Fresh bread isn’t just a treat for the taste buds; it’s also a sensory experience that awakens nostalgia and contentment. From a nutritional standpoint, baking bread at home lets you control what goes into each loaf, offering a healthier alternative to store-bought varieties that may be loaded with preservatives.
Another advantage? The process is deeply rewarding. Working with yeast dough is a delicate dance of science and artistry. You watch as the yeast becomes active, witness the dough rising heroically, and finally revel in that golden-brown crust emerging from the oven. Each loaf is a story of care, time, and tradition, embodying the spirit of homemade goodness.
Why This Recipe Stands Out
This particular homemade bread recipe has earned its place in my kitchen rotation for its ease and consistency. The measurements are clear, and the steps are beginner-friendly. But don’t let its simplicity fool you—this bread is delicious and versatile. Whether you plan to toast it for breakfast, use it for sandwiches, or break it into croutons for salad, you’ll find countless ways to make the most of each loaf.
Finally, the ingredients are widely available, so there’s no need to hunt down specialty items. Everything from the canola oil to the active dry yeast can be found in most grocery stores, which makes this recipe a perfect gateway into bread baking for both novices and experienced bakers looking for a go-to loaf.
Health Benefits and Nutritional Highlights
- Bread Flour: Bread flour is higher in protein than all-purpose flour, which helps create the ideal chew and texture in yeast-based recipes. The extra protein content produces more gluten, allowing the dough to rise well and form a structure that traps air bubbles.
- Active Dry Yeast: This tiny microorganism makes your dough rise and gives your homemade bread that airy, light quality. It also contributes to the bread’s distinctive flavor as it ferments the sugars present.
- Canola Oil: Often hailed for its heart-healthy properties, canola oil contains beneficial monounsaturated fats. It helps keep the crumb of the bread moist and extends the shelf life of your loaf.
- Sugar: While sugar often gets a bad rap, a small amount is crucial for feeding the yeast, helping it grow and create that beautiful rise. You can also reduce the sugar if you prefer a less sweet flavor.
- Salt: Salt plays an essential role in controlling yeast activity and enhancing flavor. If you try to bake bread without enough salt, you’ll notice a flat-tasting, overly risen dough.
When eaten in moderation and balanced with other nutrient-rich foods, freshly baked bread can be part of a healthy diet. If you’re concerned about sodium or sugar intake, you can adjust those ingredients slightly without compromising taste.
Step-by-Step Instructions
Before we begin, gather all your ingredients and ensure they’re at the right temperature—especially water, which must be warm enough to activate yeast but not so hot that it kills it.
-
Bloom the Yeast: In a large bowl, dissolve 1 package (1/4 ounce) of active dry yeast and 1/2 teaspoon sugar in 2-1/4 cups warm water (110° to 115°F). Let it stand until bubbly, about 5-10 minutes. This step is crucial because it tells you whether your yeast is alive and ready to work.
-
Mix the Wet Ingredients: Once the yeast mixture is frothy, add the remaining 3 tablespoons sugar, 1 tablespoon salt, and 2 tablespoons canola oil. Stir everything well to combine.
-
Combine Flour Gradually: Start by mixing in 3 cups of bread flour. Beat until smooth. Then, gradually add enough of the remaining 3-1/4 to 3-3/4 cups of flour to form a soft dough that pulls away from the sides of the bowl. The total flour used should be between 6-1/4 and 6-3/4 cups, depending on humidity and other factors.
-
Knead the Dough: Turn the dough onto a well-floured surface. Knead until the dough is smooth and elastic, about 6 to 8 minutes. If the dough sticks to your fingers, dust lightly with additional flour, but avoid adding too much all at once to prevent a dense loaf.
-
First Rise: Place the dough in a greased bowl, turning once to grease the top. Cover it with a clean kitchen towel or plastic wrap and let it rise in a warm, draft-free area until doubled in size, about 1-1/2 to 2 hours. Pro tip: A slightly warmed (but turned-off) oven can be an ideal spot for rising.
-
Shape the Loaves: Gently punch the dough down to release excess air. Transfer the dough to a lightly floured surface, divide it in half, and shape each portion into a loaf. Aim for a uniform shape that will fit neatly into your loaf pans.
-
Second Rise: Place each shaped loaf into a greased 9x5-inch loaf pan. Cover and let the dough rise again until doubled, about 30-45 minutes. The loaves will appear fuller and crest nicely above the edges of the pans.
-
Bake the Bread: Preheat your oven to 375°F (190°C). Bake the loaves for 30-35 minutes or until they turn golden brown and produce a hollow sound when tapped. Remove from the pans and let them cool on wire racks. Slicing into the bread too soon may result in a gummy interior, so allow at least 20 minutes of cooling time.
Total Time Required: Approximately 3 hours
Expert Tips and Ingredient Substitutions
1. Mastering the Knead
Kneading dough is essential for developing gluten strands that trap air and provide the bread’s springy texture. If in doubt, use the “windowpane test”: grab a small piece of dough and stretch it. If it forms a thin membrane without tearing, your dough is well-kneaded.
2. Adapting to Whole Wheat
If you’d like to increase the fiber content, you can substitute up to 50% of the bread flour with whole wheat flour. Keep in mind that whole wheat flour absorbs more moisture, so you may need to add an extra tablespoon or two of water to achieve the same dough consistency.
3. Exploring Healthier Fats
Instead of canola oil, try using olive oil, which adds a subtle fruity note and more antioxidants. You may also experiment with avocado oil for a milder flavor profile.
4. Adjusting Sugar and Salt
Looking to cut down on sugar? You can reduce it slightly without affecting the rise too much. You can also drop the salt down to 2 teaspoons if you’re monitoring sodium intake, though the flavor might be less pronounced.
5. Making It Dairy-Free or Vegan
This recipe is already dairy-free. As for vegan bakers, there’s no need to substitute anything at all since it contains no animal byproducts. Just make sure the sugar you use is certified vegan if you adhere to strict guidelines, because some sugars are processed using bone char.
Serving Suggestions
- Toast Toppings: Delicious with just butter or jam for a simple breakfast.